
If you’re a Microsoft Excel user, you’ve probably been asked in the past to work with messy data in a spreadsheet. How to remove duplicates in excel Your data may contain duplicate records that recur. You certainly don’t have time to go and check row by row in a large spreadsheet and manually find and remove duplicate records.
The good news is that Microsoft anticipated this exact need in Excel. The Remove Duplicates feature allows you to find and remove duplicate records in your spreadsheet quickly.
In this tutorial, I will teach you how to use Remove Duplicates. You will learn how to use the function to clean up a spreadsheet with duplicate rows. I will teach you tips on using the feature correctly so that only duplicate rows are removed.
Table of Contents
Start removing duplicates in Excel.
If you’re following this with the sample workbook, use the worksheet tab named Order List for this tutorial part.
Let’s start with a simple example of how to remove duplicates in Excel. In the spreadsheet below, you can see that several lines are being duplicated. We need to remove duplicate orders to make the ingredient list easier.
- Highlight the data
To remove duplicate rows, the first thing to do is highlight the data. If the sheet has no data above the table, you can highlight all columns at the top of the worksheet. In this case, I’ll highlight the data table to remove duplicates.
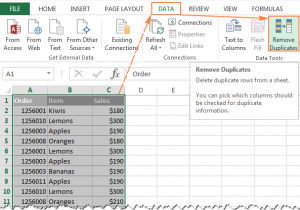
- Find the Remove Duplicates feature in Excel.
The Remove Duplicates function is located on the Excel ribbon in the Data tab. Specifically, you will find the Remove Duplicates function in the Data Tools section of the ribbon. Once found, click on it to start the wizard.
- Select the Duplicate Criteria

After clicking on the Remove Duplicates option, a new window will appear with some checkboxes. This list of options asks you to define which fields should be checked for duplicates. The default behavior is to keep them all checked.
For our simple example, make no changes in this window. Press “OK” to remove duplicates from our table.
- Review the results
Once you hit OK, Excel removes duplicates in the table and provides feedback on what was removed. When working with any dataset, I urge you to check the results.
The purpose of Remove Duplicates is to eliminate repetitive lines, but it requires care in how you use it. You can always undo the last step if you misapplied it.
Remove Duplicates on Multiple Criteria
Let’s go back to the seemingly simple menu that appeared to us when we highlighted our data. The list in this window represents each of the columns in our Excel worksheet. You will notice that each column of our Excel table has a checkbox next to it.
What does this menu mean? This box is asking you how to specify Excel when removing duplicates. Let’s see an example:
In the screenshot above, I started again by highlighting my data in the table and launched the Remove Duplicates feature. Then, I unchecked all the boxes except for “Chef” in the Remove Duplicates window. How to uninstall apps on mac The result is shown in the lower half of the image. Note that our table has been reduced to three lines, with a chef’s name each time.
When we left only the “Chef” box checked, we asked Excel to only check the Chef column for duplicates. The first time we had seen a repeat chef in the name, we had cleared the entire line; We didn’t care that the other columns differed.
Take care of Remove Duplicates in Excel.
That is why it is essential to be careful when using the “Remove Duplicates” feature. If you leave it set to remove a single factor, you can accidentally remove the data you want to keep.
Tip: The boxes left checked in the Remove Duplicates window are the combination that Excel performs to check for duplicates. Leave multiple boxes checked to remove precise duplication.
Often a single column of data will not be sufficient to judge duplicates. If you maintain an online store and have a customer database, chances are you will have more than one example, “Mike Smith,” in your data. Best printer for home You need to check multiple columns – such as customer name and customer address or registration date, to check for duplicates. This is precisely why we check for multiple columns when we remove duplicates.
Suppose you want a precise way to remove duplicates. Leave the multiple boxes checked (columns) when you run the Remove Duplicates function. And, of course, always check the data after performing Remove Duplicates.
When to be selective
If you follow the example workbook with me, use the worksheet tab with the title Duplicate Offsets for this tutorial part.
You might be wondering: is there a situation where you would uncheck some of the boxes? Absolutely. Let’s take a look at an example.
In the spreadsheet below, I employed data movement and accidentally downloaded the report from two different times. I have the time and time of each employee, plus a column with the date I downloaded the report. Two of each row exists, with the unique factor being column F, the Download date relationship.
Let’s think about this: if I can check all columns for duplicates, Excel won’t detect any duplicates. But, I want to remove employee move data duplicates. I don’t care about the day I downloaded the report, so I have to exclude column F when I remove the duplicates.
These rows aren’t exact duplicates – they don’t share all fields, but I need to remove duplicates based on AE columns.
To do this, you could re-highlight the table and rerun Remove Duplicates. This time, I’ll leave you all the boxes checked except the Report Download Date.
Think of it like this: the boxes you leave checked are the columns that Excel includes in its duplicate check step. If additional columns should not be checked for duplicates, deselect them from the Remove Duplicates window.
Use Remove Duplicates for blank lines.
One of my favorite uses for Removing Duplicates is to get rid of multiple blank lines in my data. To remove blank rows, How to turn off google assistant highlight the data in the table. Then, remove the duplicates and leave all boxes checked. Excel will remove all blank lines – except the first one! Since the first blank row isn’t technically a duplicate, Excel leaves it intact. You need to delete that row manually.
Recap and keep learning
Removing duplicates from an Excel spreadsheet is a critical data cleanup skill. When working with a dataset, it is difficult to have time to remove duplicate records manually. This is why it is worth learning about the “Duplicate Removal” functionality built into Excel.
Here are two other spreadsheet tutorials to keep digging deeper into data cleanup in Excel:
- Microsoft’s official Duplicate Removal documentation is a useful second source for learning about the functionality.
- Bob Flisser’s 12 Techniques for Capable Users tutorial contains a brief summary of the Duplicate Removal feature and other vital data management techniques.


